


Tutorials
Adding a new unit to the game
Background info on how the engine handles animations
Before I get into the
instructions of adding a new unit to the game I would
like to give a background of how units are used/handled in the American Conquest
engine.
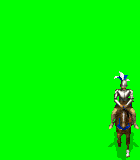
National color
When you start a game in American Conquest, in the options you are given the
choice to choose which color you would like to be in the game, red, blue, orange
etc. we call this the "national color". So when you start the game
certain parts of a unit or building will displayed that chosen color, this is how you
distinguish your units & buildings from other players. The way the game
engine assigns this specific color to a unit or building is by shading any
parts on a unit or building that has pink on it, this particular pink's value
is: Red: 255, Green: 0, Blue 255, So when you make your unit or building,
put this pink on any parts of the unit or building that you wish to display the
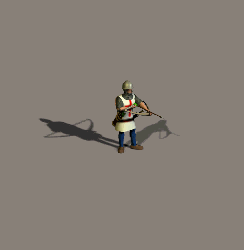
national color, for example this could be a units pants, arrow quiver, a stripe
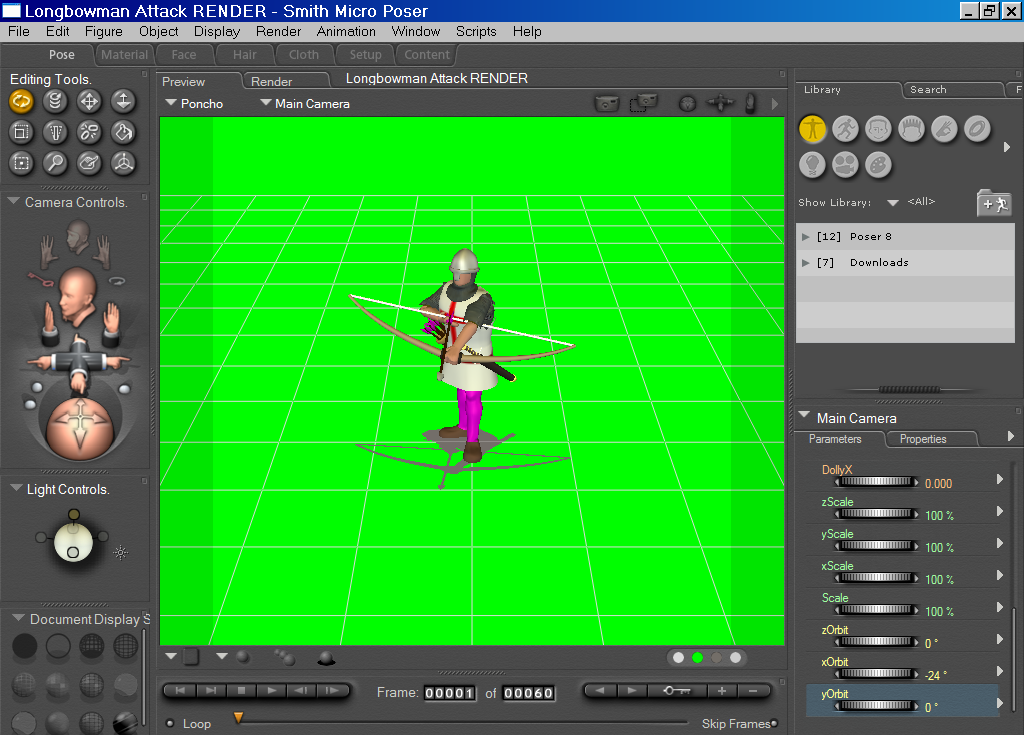
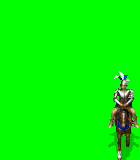
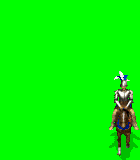
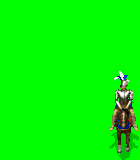
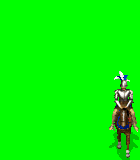
on the units shirt, feathers etc. An example could be my Longbow unit, notice
his tights/pants & his arrow feathers are pink:
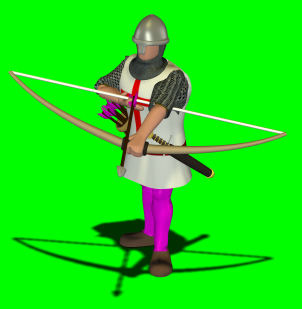
These will be displayed in the game with the national color red, blue, orange etc.
Background color
When making a new unit or building it is important to have the background
color a specific green, this is what is called the transparent color, this is
done so that only the unit is visible in the game and you can still see the
background and terrain of the game, that way the terrain the unit is standing on is visible
& units can stand side by side and next to buildings
and be displayed correctly. The green you want to use is: Red: 0, Green: 255,
Blue: 0.
Lighting & shadows
For units, lighting appears from the top and the units shadow appears directly
below the unit. For buildings, lighting appears from the east side of the
building with the west side darker and the shadow also appearing from the west
side.
How animations are handled
The American Conquest engine handles unit animations & buildings with a
graphics package or "GP". These are the .GP files that you will see
when you unpack the .gsc file. The .GP files contain all the animation frames,
which are in .bmp format. The .GP files also contain one .lst file, which contains
the names of all the frames inside the .GP file.
For each unit action/animation there is a separate .GP file. For example there is a .GP file for a units walking animation, there is a .GP file for a units attack animation, and a .GP file for a units death animation etc. These are the different types of animations used by units in the game, an example is displayed next to them:
| Walking/Moving: Self explanatory, a unit walks/moves. | 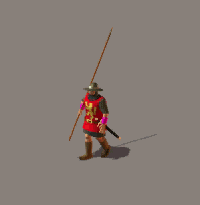 |
| Weapon lowering: This is usually a pike unit. When you select a unit to attack the enemy the Pikeman begins to lower his pike into the attack position. | 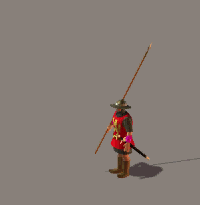 |
| Weapon lowered, moving forward: This is usually a pike unit. After the Pikeman has lowered his pike into attack position (see weapon lowering above) he begins to walk forward in this position towards the enemy |  |
| Attacking/Firing: This is when a unit uses his primary weapon such as sword/pike/lance or archer or musketeer firing his shot. This animation is when the Pikeman reaches the enemy after walking with his pike lowered in the attack position (see above 2 examples) he then lunges/strikes his pike at the enemy engaging in combat. This is also when an Archer releases his arrow or Musketeer fires his shot. | 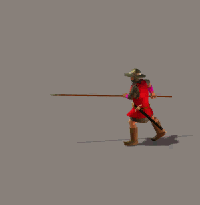
 |
| Reloading: If the unit is a shot/projectile unit, after the unit fires it needs to reload the weapon, this is the reload animation, for example the musketeers ram the musket with powder and shot | gif |
| Death: Self explanatory, when the units dies, this is the animation of the unit falling to the ground dying. | 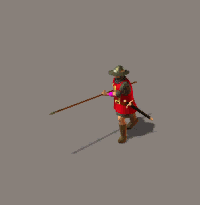 |
| Idle/Rest: This animation is used when a unit is standing stationary and not performing any actions (idling) an example could be a unit turning his head, or a horseman patting his horse, or a peasant kicking a small stone. A lot of the time you can just use other animations, like a Pikeman standing with his pike, this is just the Pikemans walking animation using a couple of frames from it. | gif |
| Melee: This animation is used with all shot/projectile units (Musketeers, Archers etc.) basically any unit that fires something. The melee action/animation is used when the enemy units are too close for your unit to fire on so they must attack with a sword, or when you select "Melee Attack" from the unit selection tab, they will only attack with a sword. | 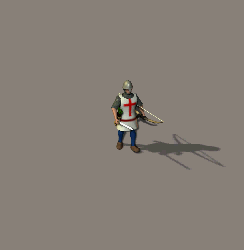 |
Please note that not every unit uses all of the above animations for example a Pikeman doesn't use the melee attack animation, a mounted horse armed with a sword only will not use the lowering animation, and some units don't have to have a Idle/Rest animation.
The animation frames
Now onto the actual animation frames contained
in the .GP. Firstly, the American Conquest engine uses 9 westward direction animations,
to easily explain what I mean, imagine a clock, 6 o'clock is the front animation
(South) then in between 6 & 7 o'clock is the next direction animation (South
West) etc. So we have 9 directions from 6 o'clock to 12 o'clock, this gives us
180 degrees of rotation (half a circle). The game engine mirrors these 9
directions for the Eastward direction animations so you don't have to do any
Eastward animations (12 o'clock - 6 o'clock).
Below is a picture to illustrate
this, each number listed is what direction the unit faces:
 |
|
Click to enlarge |
Here is the Pikeman as an example of the unit directions:
| Direction 1 | Direction 2 | Direction 3 |
 |
 |
 |
| Direction 4 | Direction 5 | Direction 6 |
 |
 |
 |
| Direction 7 | Direction 8 | Direction 9 |
 |
 |
 |
Rendering the unit
Now because the unit uses 180 degrees of rotation (one half circle, which is from 6
o clock to 12 o clock) when you render your unit, you need to set the camera up
to render the 9 different directions, to work this out is simple, 180 degrees
divided by 8 directions =22.5 degrees. If your wondering why we divide 180 by 8
this is because the first direction (south) counts as 0. In Poser you change the
yOrbit values to change the direction of the camera. So each direction is as
follows: 0, 22.5, 45, 67.5, 90, 112.5, 135, 157.5, 180. So I render all the
frames for direction 0, then I render all the frames for direction 22.5, then
all the frames for direction 45 and so on.
You also need to set the unit up so that you are looking down on it from an angle, this is because the American Conquest game (like most other RTS games) uses an isometric view of units, so you also need to setup up the camera to display the unit on an angle. In Poser this is done with the xOribit values. I have my units setup with about -24 degrees of an angle.
|
|
|
Click to enlarge |
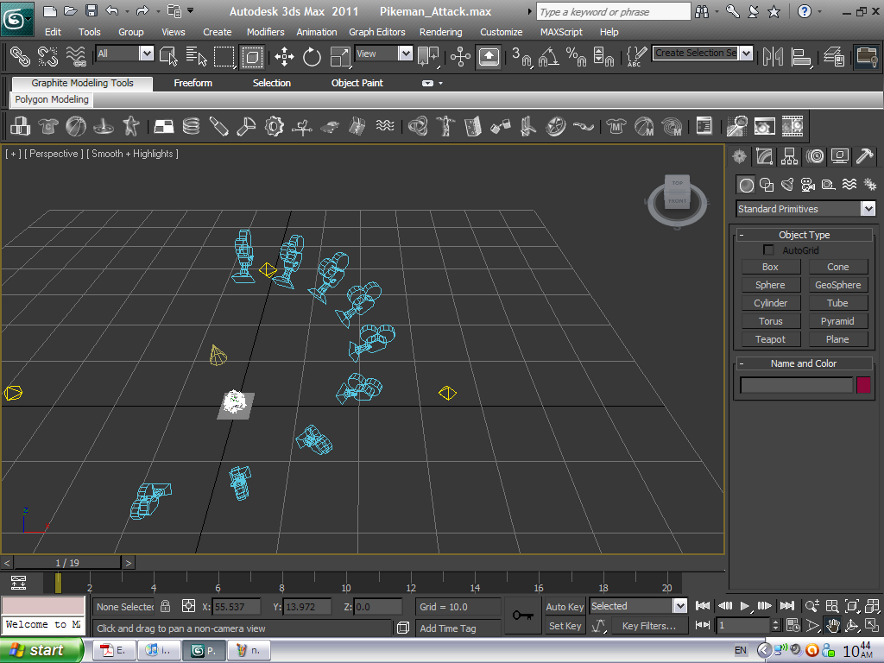
In 3D Studio you can add multiple cameras, as HWK Poppen does, here is an example of what his camera setup looks like:
|
|
|
|
Click to enlarge |
Click to enlarge |

Numbering/Naming of animations
Animation .bmp frames need to
be numbered/named in a specific order. They are numerically named in 5 digit
length names e.g. 00001.bmp. Each .bmp frame name for a particular direction
increments by 9. For example the South/6 o'clock direction .bmp frame name start
at 00000.bmp, the next .bmp frame names is 00009.bmp, next one is 00018.bmp,
next one is 00027.bmp and so on.
So for each individual direction the first .bmp frame name is labeled what direction it is, so the first south/6'oclock direction .bmp is named 00000.bmp, next direction 00001.bmp, next direction 00002.bmp, next direction 00003.bmp, next direction 00004.bmp, next direction 00005.bmp, next direction 00006.bmp, next direction 00007.bmp, next direction 00008.bmp, and the final direction, which is North/12 o'clock is 00009.bmp. Each one of those individual direction .bmp frames number/name increases by 9 for that particular direction.
Below is the Spanish Conquistador walking animation .bmp frames for the south/6 o'clock direction as an example:
 |
 |
 |
|
00000.bmp |
00009.bmp |
00018.bmp |
 |
 |
 |
|
00027.bmp |
00036.bmp |
00045.bmp |
 |
 |
 |
|
00054.bmp |
00063.bmp |
00072.bmp |
 |
 |
 |
|
00081.bmp |
00090.bmp |
00099.bmp |
 |
 |
 |
|
00108.bmp |
00117.bmp |
00126.bmp |
 |
||
|
00135.bmp |
How I go about adding a new unit to the game
Create your new unit with whatever 3D software you use, like Poser, 3D Studio
etc. When I am rendering my unit for all the animation frames, I create 9
folders for the 9 different directions,
I name them 1,2,3,4,5,6,7,8,9 (you can name them whatever you like as the
folders name is irrelevant) I then render the different direction frames
to the appropriate folder e.g. South/6 o'clock direction goes in "1" folder,
the next South West direction frames goes
in "2" folder etc. it doesn't matter what you name the rendered .bmp's as we are
going to use the handy File Renamer v1.0.0 tool which will automatically rename them
the correct 5 digit length name and in increments of 9. With Poser I use the GSC
Render Script which automatically renders your units from the correct directions
without you having to manually change the camera for each direction. The GSC
Render Script For Poser an be found here.
Once you have rendered all the frames in the appropriate folders use the File Renamer v1.0.0 tool to rename the frames to the correct format/order, please see here to download the tool and for correct instructions how to do this.
Once I have renamed all the .bmp frames in each direction folder with the File Renamer v1.0.0 tool I then copy all the frames from each direction folder (except "1" folder as they stay there) and paste them into the "1" folder.
My next step in the new unit process is to create the .lst file which contains all the names of the animation frames that I have copied and pasted into the "1" folder. You could type them all out individually but this would take a long time and would become very very boring, so I created a tool that creates the list automatically for you, the GSC File Lister v1.0 tool, to download and for installation instructions and how to use this tool please see here.
Now that we have all the animation frames and the .lst file created, we can pack the frames and .lst file into the .GP format so the game engine can handle it. To do this I use the MegaPack tool, to download and for instructions on how to use this tool see here.
Because the game has a zoom out mode; "L mode" (where you can zoom the screen out and get a birds eye view of the map) there are separate .GP files for this, which are just the units normal size .bmp frames made smaller, you can do this very easily with the MegaPack tool, which gives you the option to pack the .bmp animation frames in a variety of sizes, for information on this see here.
You will also need to create an icon image, this small image is the one you see in the game when you click on a building and want create a new unit such as peasant, pikeman etc. you click this icon to make the unit. Its only a small image 16x16 pixels, for more information on these files and how to add them to the game please see here.
Now that we have the unit animations packed into the .GP file we can go about
editing/adding all the unit parameter data files so we can add the unit to a nation,
assign the unit health levels, attack levels, which building the unit is created
at etc. See the GSC File Information page here.
You will also need to add any new file names to the FILELIST.LST file, this file
lists every file that the game uses and is essential for any new files to appear
in the game.
You also need to add the the new units name to the NMLIST.TXT file, this file
lists every unit and building in the game and is essential for your unit to
appear in the game. You will also need to list the units .MD file and a description
of the unit in the MDLIST.TXT file which is found in the /TEXT folder, the
MDLIST.TXT file contains all the .MD files and a description of what the unit or
building is. The other file which you must list your new unit in is the nations
.NDS file, these particular .NDS files are assigned to every nation in the game,
such as England, France, Germany etc. the nations .NDS file contains all the
units and buildings available to that particular nation. For more information on
.NDS files please see here.
OK we now have all the relevant files created and edited, we can now pack all the files up to be added to the game, to do this we use the GSC File Utility, which will pack all the files into a GSC file format which is handled by the game engine. To download the GSC File Utility and for instructions on how to use this tool see here.
And that's it, you have now successfully added a new unit to the game! Start the game and head to the building that you assigned the new unit to be created at and you can now create the unit in the game!